Manage customer lists
The Customer feature allows you to search for customers by variables in the system, update customer information, divide customer groups into small groups, tag customers at the same time,...
At the Dashboard screen, select the Customers section.
I. Definition of variables that can be filtered by the condition in the Customer feature
In the Customer section, filter or search for customers/customer groups by system variables.
Symbols of filter commands:
= : Equals (for both numeric and character values)
> : Greater than (numerical values only)
< : Less than (for numeric values only)
!= : Other (for both numeric and character values)
{user_id}: This is the customer ID on the fanpage (not the UID of the customer on Facebook). When filtering by {user_id}, the filter value to enter is a 16-digit chain.
Example: {user_id} < 4830767070326882 to filter all customers with {user_id} < 4830767070326882
{name}: is the first name of the customer's Facebook account. When filtering by {name}, the filter value to enter is the Facebook name of the customer you want to find.
Example {name} = Alex to filter customers named Alex.
{full_name}: is the full name of the customer's Facebook account. When filtering by {full_name}, sort by the full Facebook name of the customer you want to find.
For example {name} = Alex Wang to filter customers whose full name is Alex Wang.
{email}: is customer's email information provided in User Email, User Input, Webform. When filtering by {email}, the filter value to enter can be a specific email of a customer or no value (empty).
For example {email} != to filter customers who have provided their email, {email} = to filter customers who do not have email.
{phone}: is customer's phone number has been provided in the User Phone, User Input, and Webform objects. When filtering by {phone}, the filter can sort by a specific phone number of a customer or no value (empty).
For example {phone} != to filter customers who have provided their phone number, {phone} = to filter customers who do not have a phone number.
{address}: is customer's address information
{gender}: is the gender of customers
Example {gender} = Mr. to filter male customers, {gender} = Ms./Mrs. to filter female customers
{birthday}: is the customer's date of birth. Format dd/mm/yyyy
{city}: is the customer's current residential city.
{locate}: is the customer's geographic location.
{last_seen}: is the time when the customer last viewed the page's message
{ref}: is a ref link that leads customers to subscribe to the fanpage. When filtering by {ref}, the filter value is the chain of characters after ref= in the ref link.
For example, if your Block A has a ref link https://m.me/362573507472549?ref=chatbotviral, then to filter customers who visit this ref link and are recorded as subs (have never messaged the page before), filter {ref} = chatbotviral
{tags}: is the tag attached to the customer
Example {tag} = A to filter all customers tagged A, {tag} = A or {tag} = B to filter all customers tagged A and B
{timezone}: is the time zone at the customers’ location from Facebook.
{created_at}: is the time the customer was recorded as subs in Fchat
Example {created_at} < 11/01/2021 AND {created_at} > 11/12/2020 to filter customers who have entered the system within 1 month, from 11/12/2020 to 11/01/2021
{lucky_code}: is the lucky code assigned to customer. This code is provided in the Livestream Dial minigame.
{status}: is the customer's subs status including:
- Comment: is the status when new customers comment, does not subscribe yet because they haven't sent a message to the fanpage yet, so they can't tag the classification yet
- Sub is the status when customers subscribe to the system and operations such as tagging or sending messages can be performed.
- Error: is the status when customers with system format errors
- Stop: is the status when customers who unsubscribed - stop receiving messages automatically from fanpage (in campaign, sequence, menu)
{first_visited_block}: is the first block that a customer visits when entering the system. When filtering by {first_visited_block}, the filter value to enter is the id of the block (the string of numbers after the id= in the URL of the Block)
For example, your Block link is https://fchat.vn/automation/message/edit?id=5c4040323803895947164d3d, then to filter customers who visit this block first, you filter by condition {first_visited_block} = 5c4040323803895947164d3d
{last_visited_block}: The last block the customer has visited since entering the system. The first block customers visit when entering the system. When filtering by {last_visited_block}, the filter value to enter is the block id (the string of numbers after the id= in the Block's URL)
For example, your Block link is https://fchat.vn/automation/message/edit?id=5c4040323803895947164d3d, then to filter customers who stop the script in this block, filter by the condition {last_visited_block} = 5c4040323803895947164d3d
{district}: is customer's district information
{ward}: is customer's ward information
{inboxed_24h}: is customers who texted within 24 hours. The status of this variable includes YES - filter customers who interact within 24h and NO - filter customers who interact outside 24h
{point}: is the number of points accumulated in the Points feature.
{point_total}: is the accumulated number of points earned by customers when making purchases (used in member ranking scenario)
II. Operations in the customer section
1. Search for customers
1.1. Search for specific customers
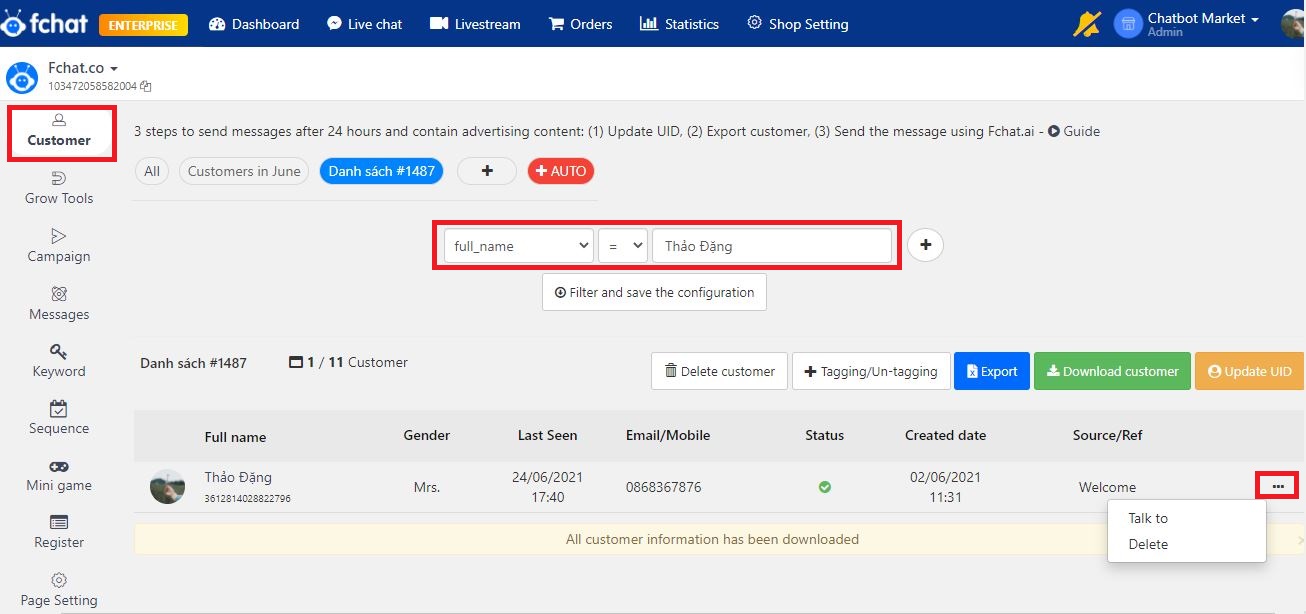
Find customers by id {user_id}, name {full_name}, phone number {phone}, email {email}, address {address}, birthday {birthday},... by selecting the variable >> enter value >> Filter
Example: Search by customer name
Here you can also:
(1) Talk to: Go to a conversation with a customer
(2) Delete: Remove customers from the system (this feature only applies to the paid version)
1.2. Search customer groups and save lists to manage
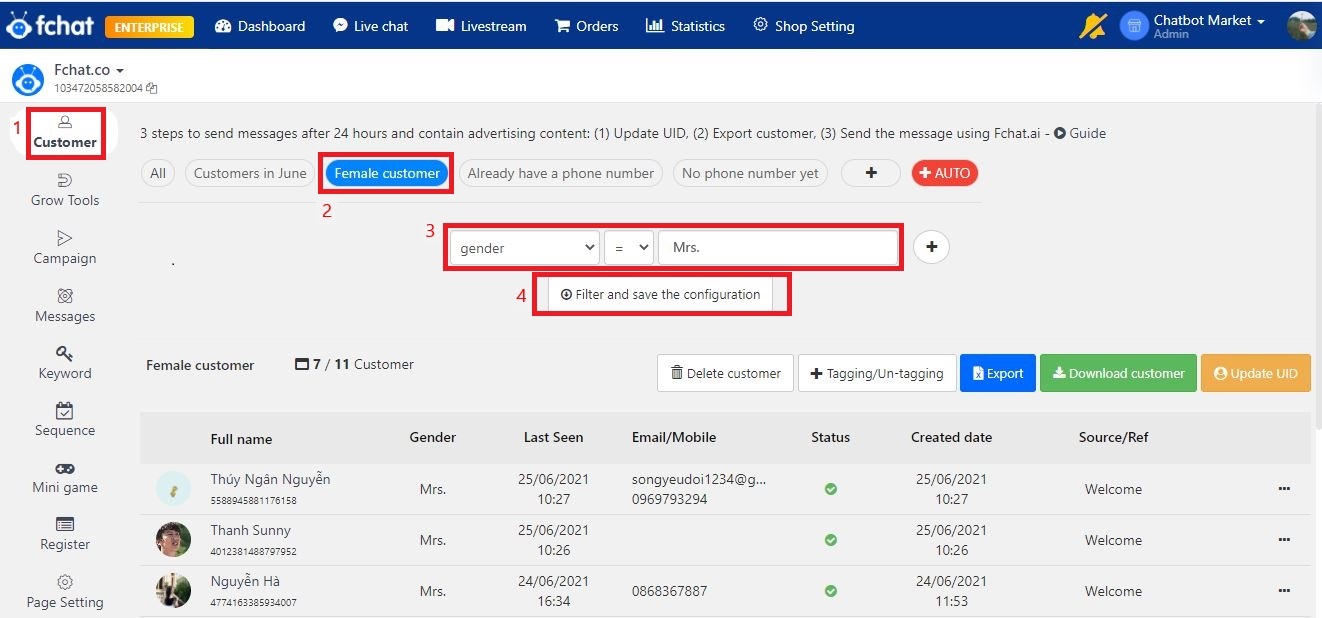
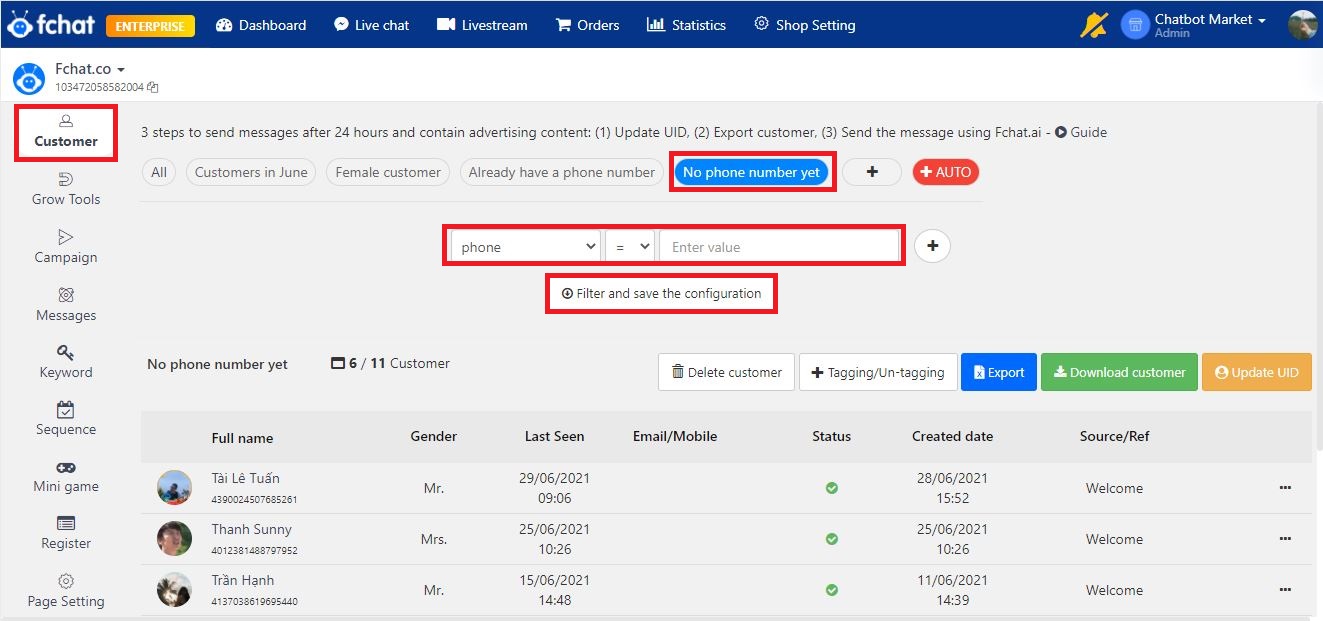
Search for customer groups by customer tag {tag}, gender {gender}, city {city},... and save the lists for management by (1) adding a list > > (2) select variable >> enter value >> (3) Filter and Save
For example:
- Filter customers by gender
- Filter customers by who already provide a phone number
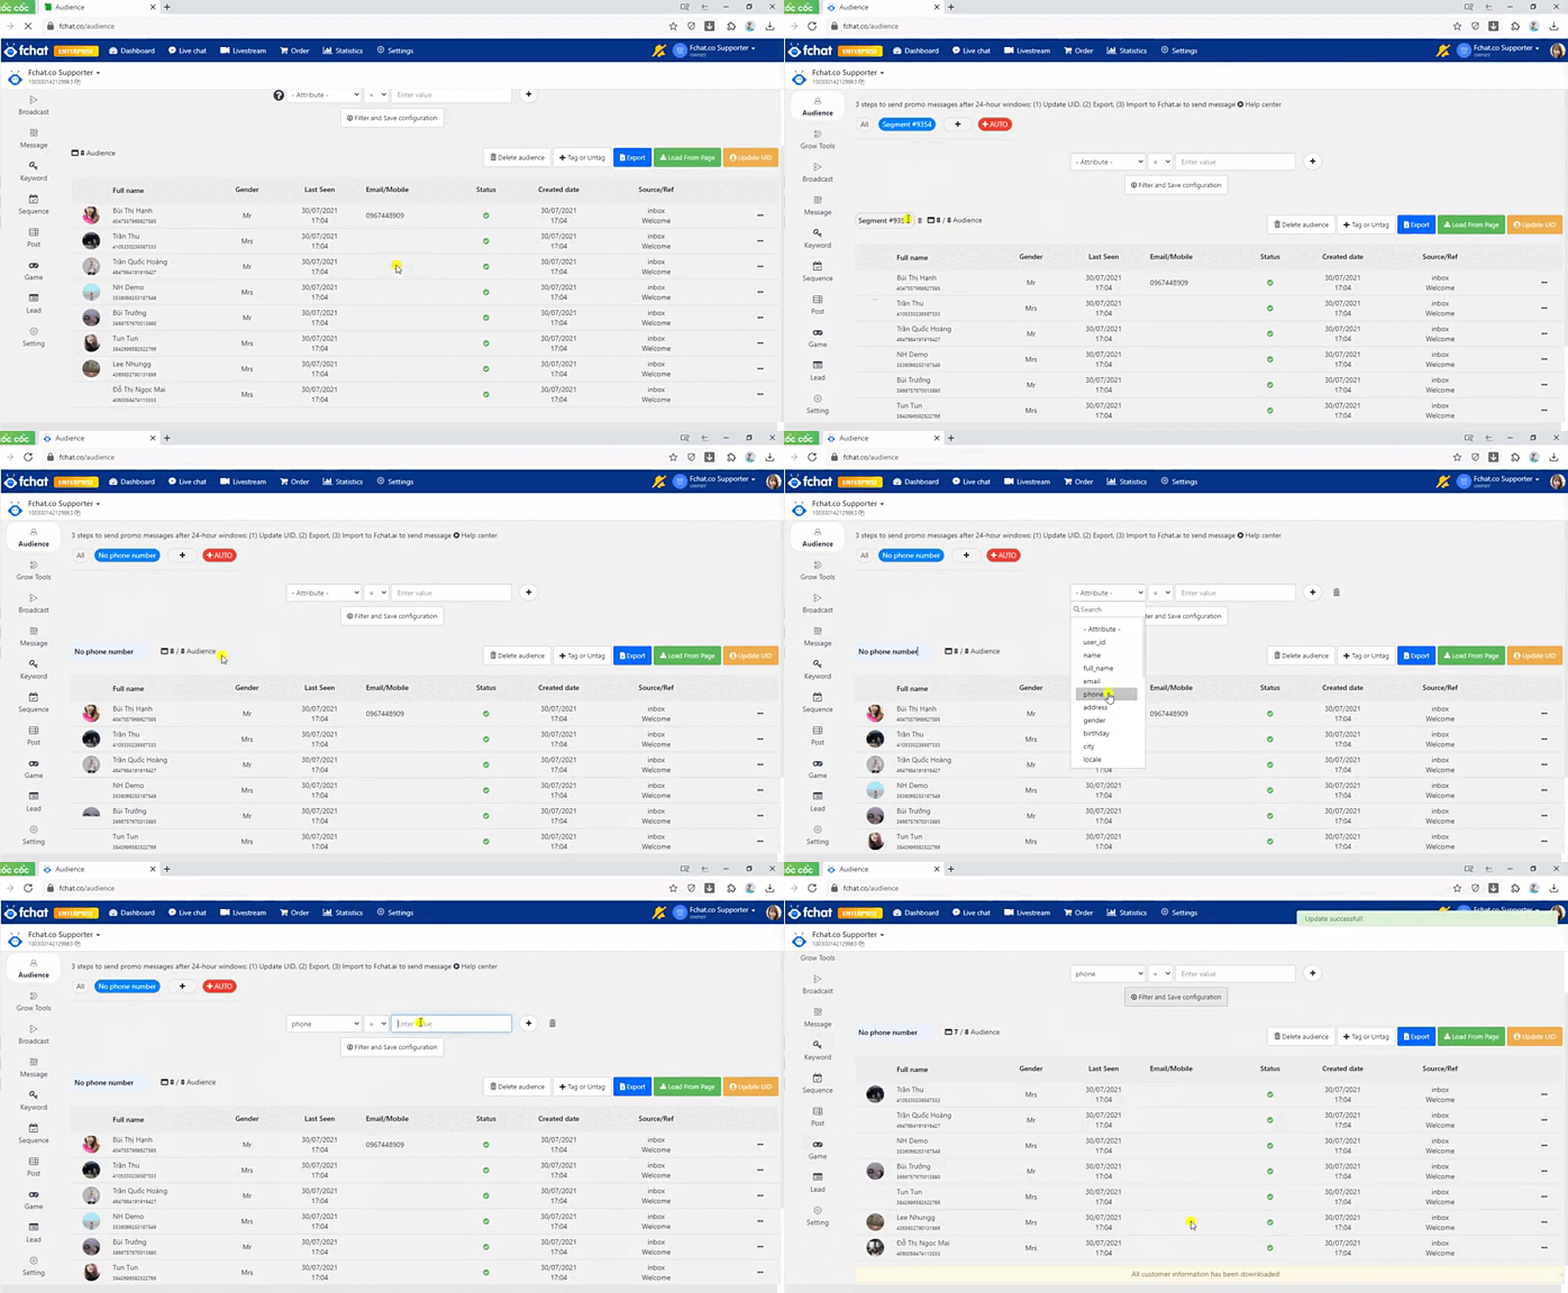
- Filter customers who have not provided a phone number:
2. Bulk tagging of customers
In the Customers section, choose an existing customer list or create a new customer list.
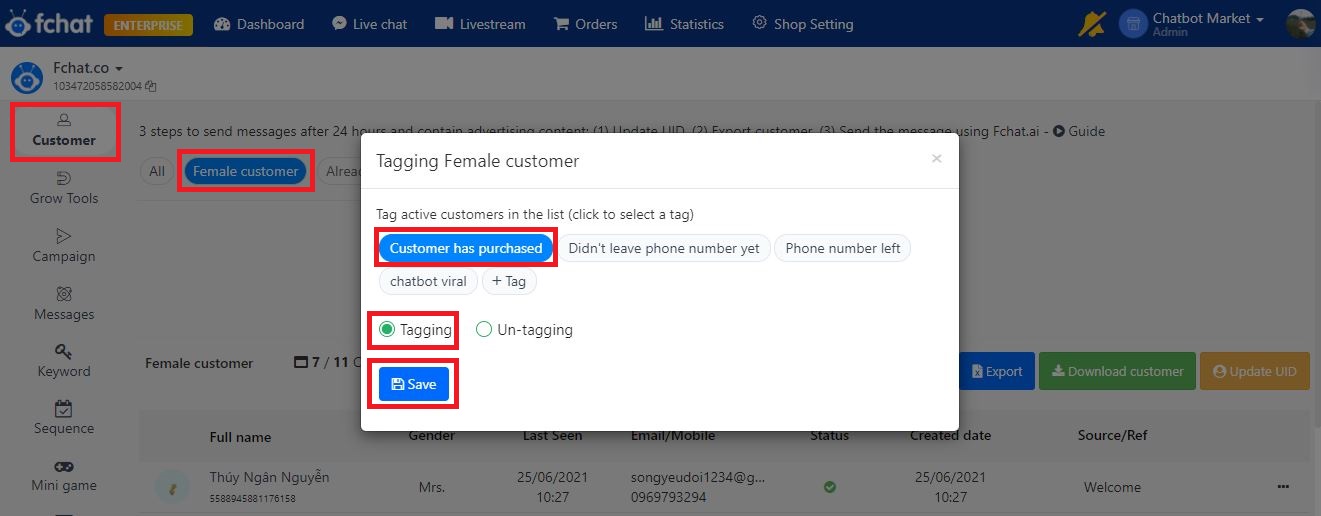
Next, enter customer information options including variables: user_id, full_name, gender, phone, email, birthday, city, address, last_seen,... with specific values as desired, then click in the box Tagging and select the tag to attach to the customer >> Save.
For example, Auto-tagging by gender with all-female customers, choose the variable Gender = Sister and follow the steps in turn as shown in the illustration below.
Then, click the button to tag/untag >> select the tag > tag > save and the selected customer list will be tagged in bulk automatically.
3. Break down the set of customers to send campaigns
When sending a campaign, split the list of customers to send in small groups of less than 10,000 people according to Facebook's regulations. Dividing the customer group to send also allows your page to reduce the possibility of being marked as spam and ensures that the staff on the page is not overwhelmed when customers respond.
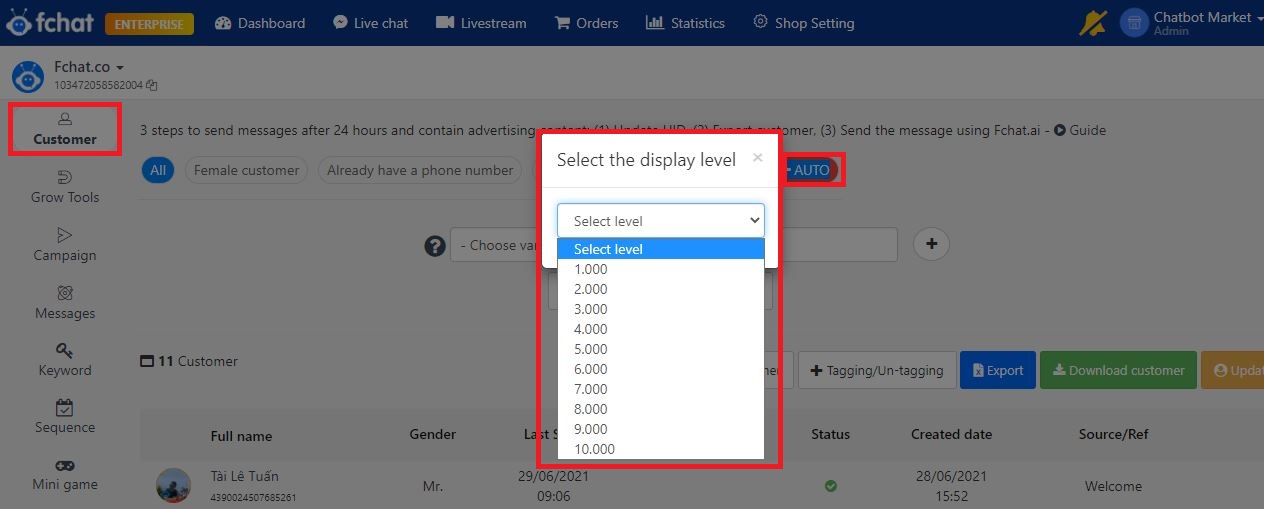
Automatically dividing the customer list into small groups from 1000 to 10,000 customers by clicking AUTO section > select the number of customers in each list.
The system needs a period of time to divide and tag customers automatically. After splitting, the customer lists show a name of the form [number of divisors_number of lists] like 8000_1 (customer list has 8000 people, file 1), and the customers in the list are automatically assigned a tag to distinguish it from other lists.
4. Delete the list and remove the customer from the list
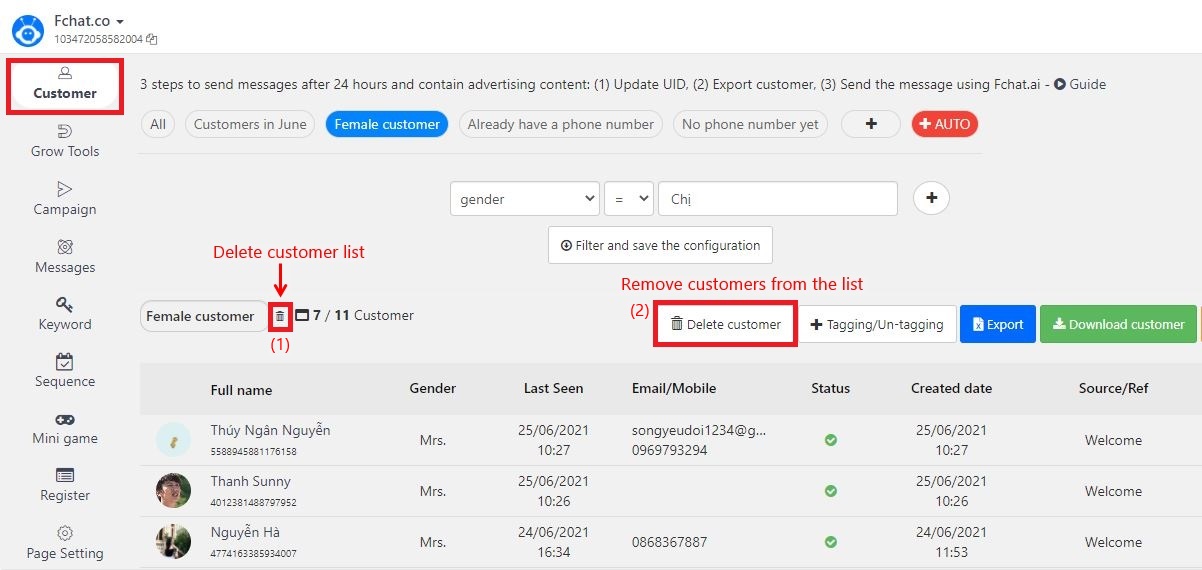
To delete a list of customers, click on the list name, to the right of the list name, a delete icon will appear, click on it to delete this list (1). When deleting a list, the customers on that list are still in Your Customers and still receive the page's messages.
To delete the customers in the list, click on the delete icon (2) in the image. When deleting customers from the list, these customers will disappear from the Customers section of your page and will no longer receive page messages.
Wishing you success!
