Campaign: Send a message to all customers who have inboxed the fanpage
One of the outstanding features of Fchat in Automation Marketing is the feature of sending mass messages to all customers who have inboxed the fanpage. With this feature, you can send messages and gifts to potential customers or to all customers who have messaged the fanpage quickly and easily.
To submit a campaign, follow these steps:
Step 1: Create a list of customers who want to send the campaign
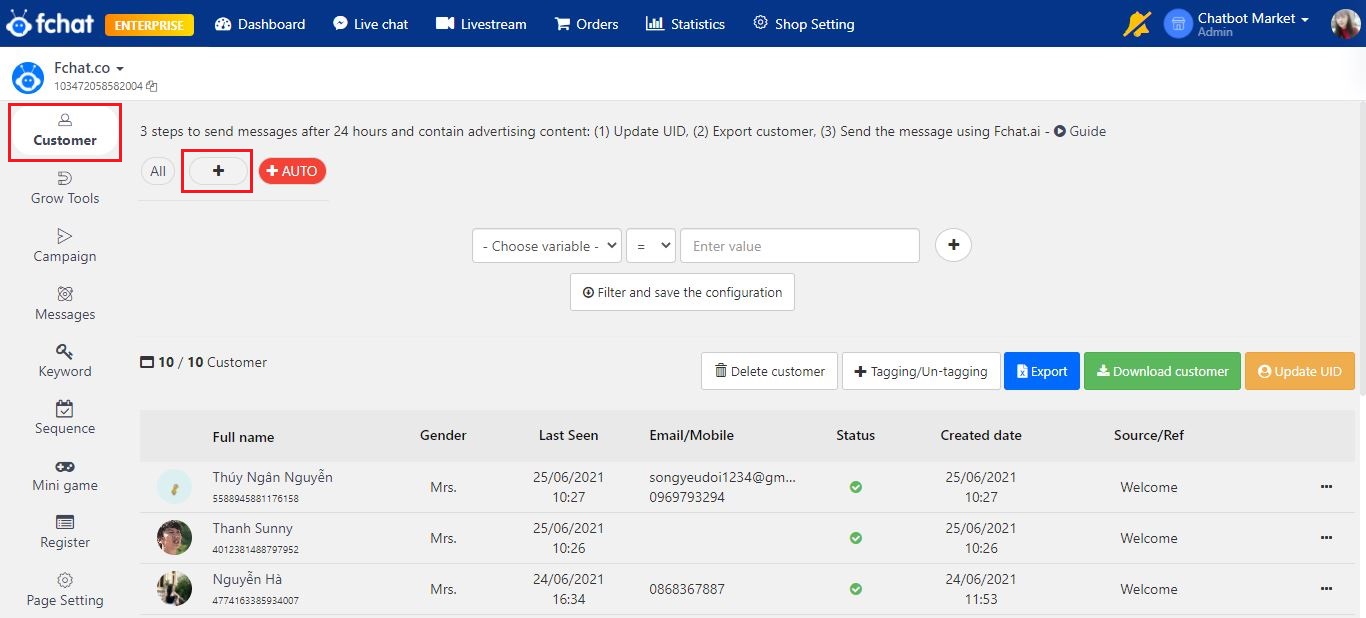
Create a list of customers to send the campaign in the Customer section >> Click on the (+) icon
Here, name your customer list and choose which customers to send your campaign to by variables like name, full_name, gender, user _id, phone, email, created_at (date of creation)...
Note: It is recommended to split the customer file to send the campaign, each list should not exceed 10,000 customers.
>> How to create and manage customer lists
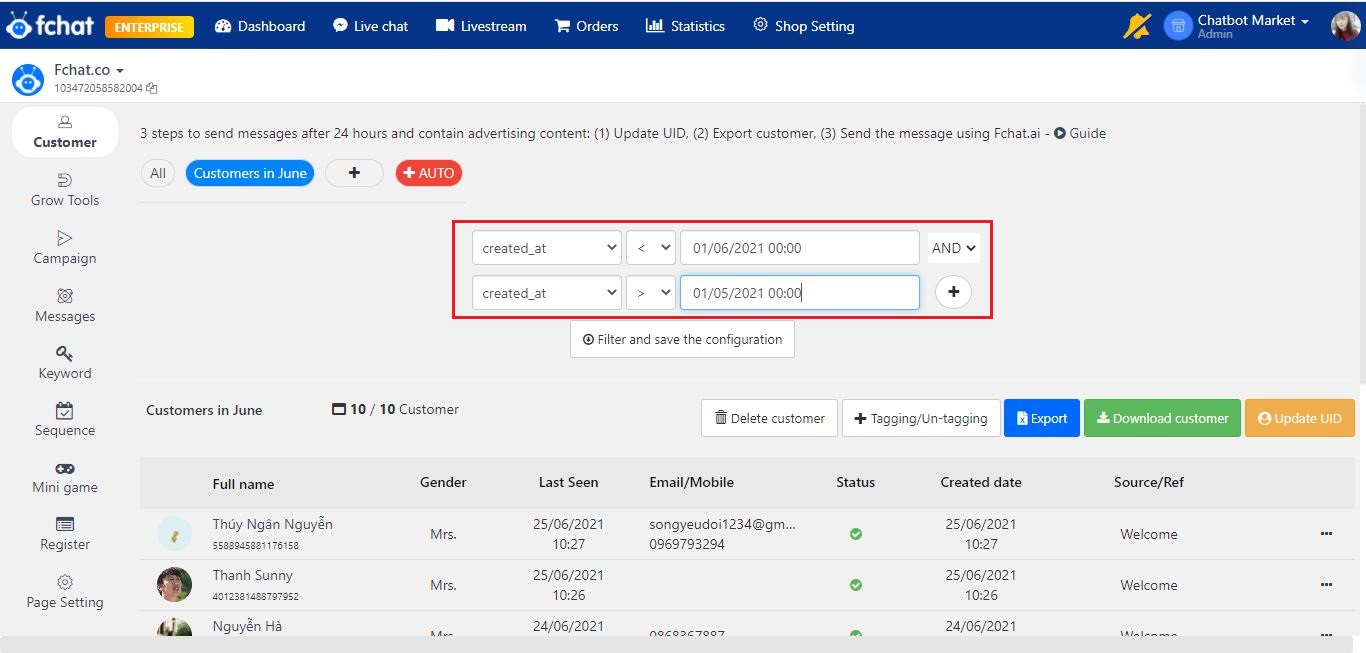
Example: Create a list of customers who messaged the page in April to send a campaign
Choose the condition variable created_at < 05/01/2020 00:00 AND created_at > 01/04/2020 00:00
Note: Skip step 1 to send campaign messages to all your customers.
Step 2: Check the token and refresh the fanpage connection
This is an important step to ensure that the campaign is sent out according to the delivery schedule and content.
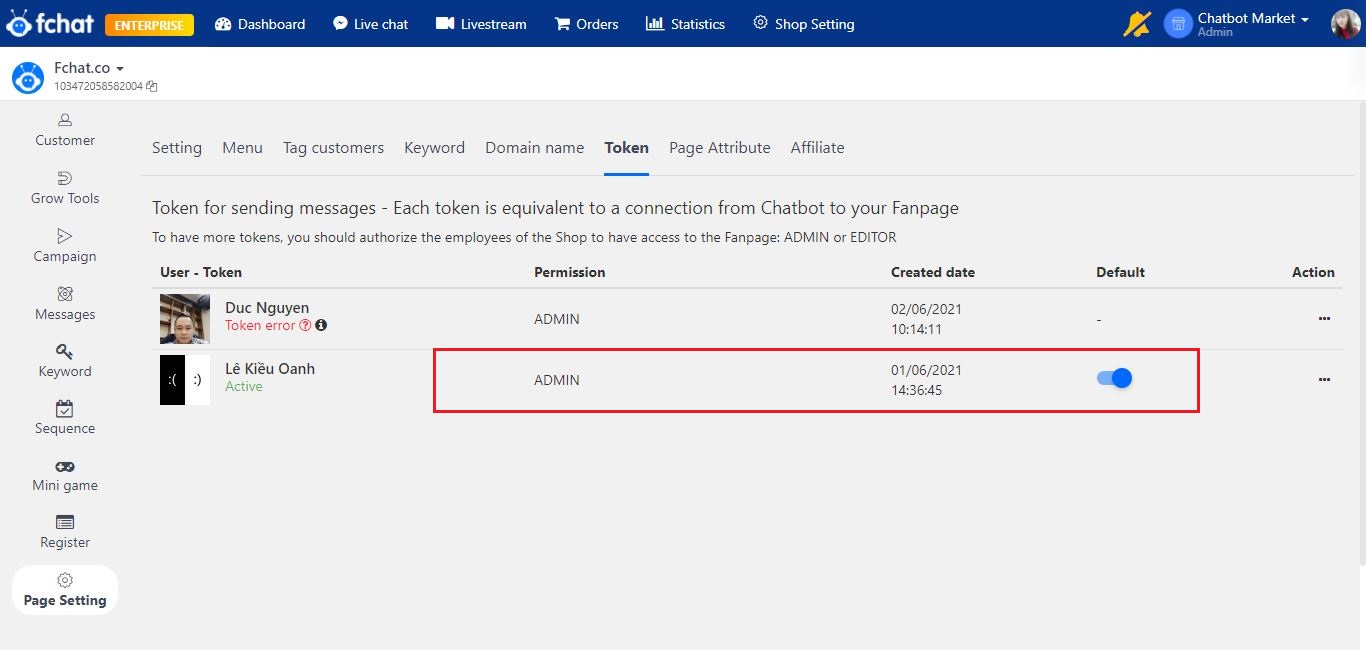
First, go to the Settings page >> Tokens to check and make sure there are no faulty tokens (if there is an error token, delete the error token or report the error account to log out > re-login to get the tokens of other users whose account is active) and refresh the page permissions.
Next, enable the active Admin token to send the campaign (if the Admin token is faulty, it needs to be fixed before sending the campaign).
>> How to fix token error
Step 3: Campaign settings
In the vertical menu on the left of the page's working screen, select Campaign >> + New campaign
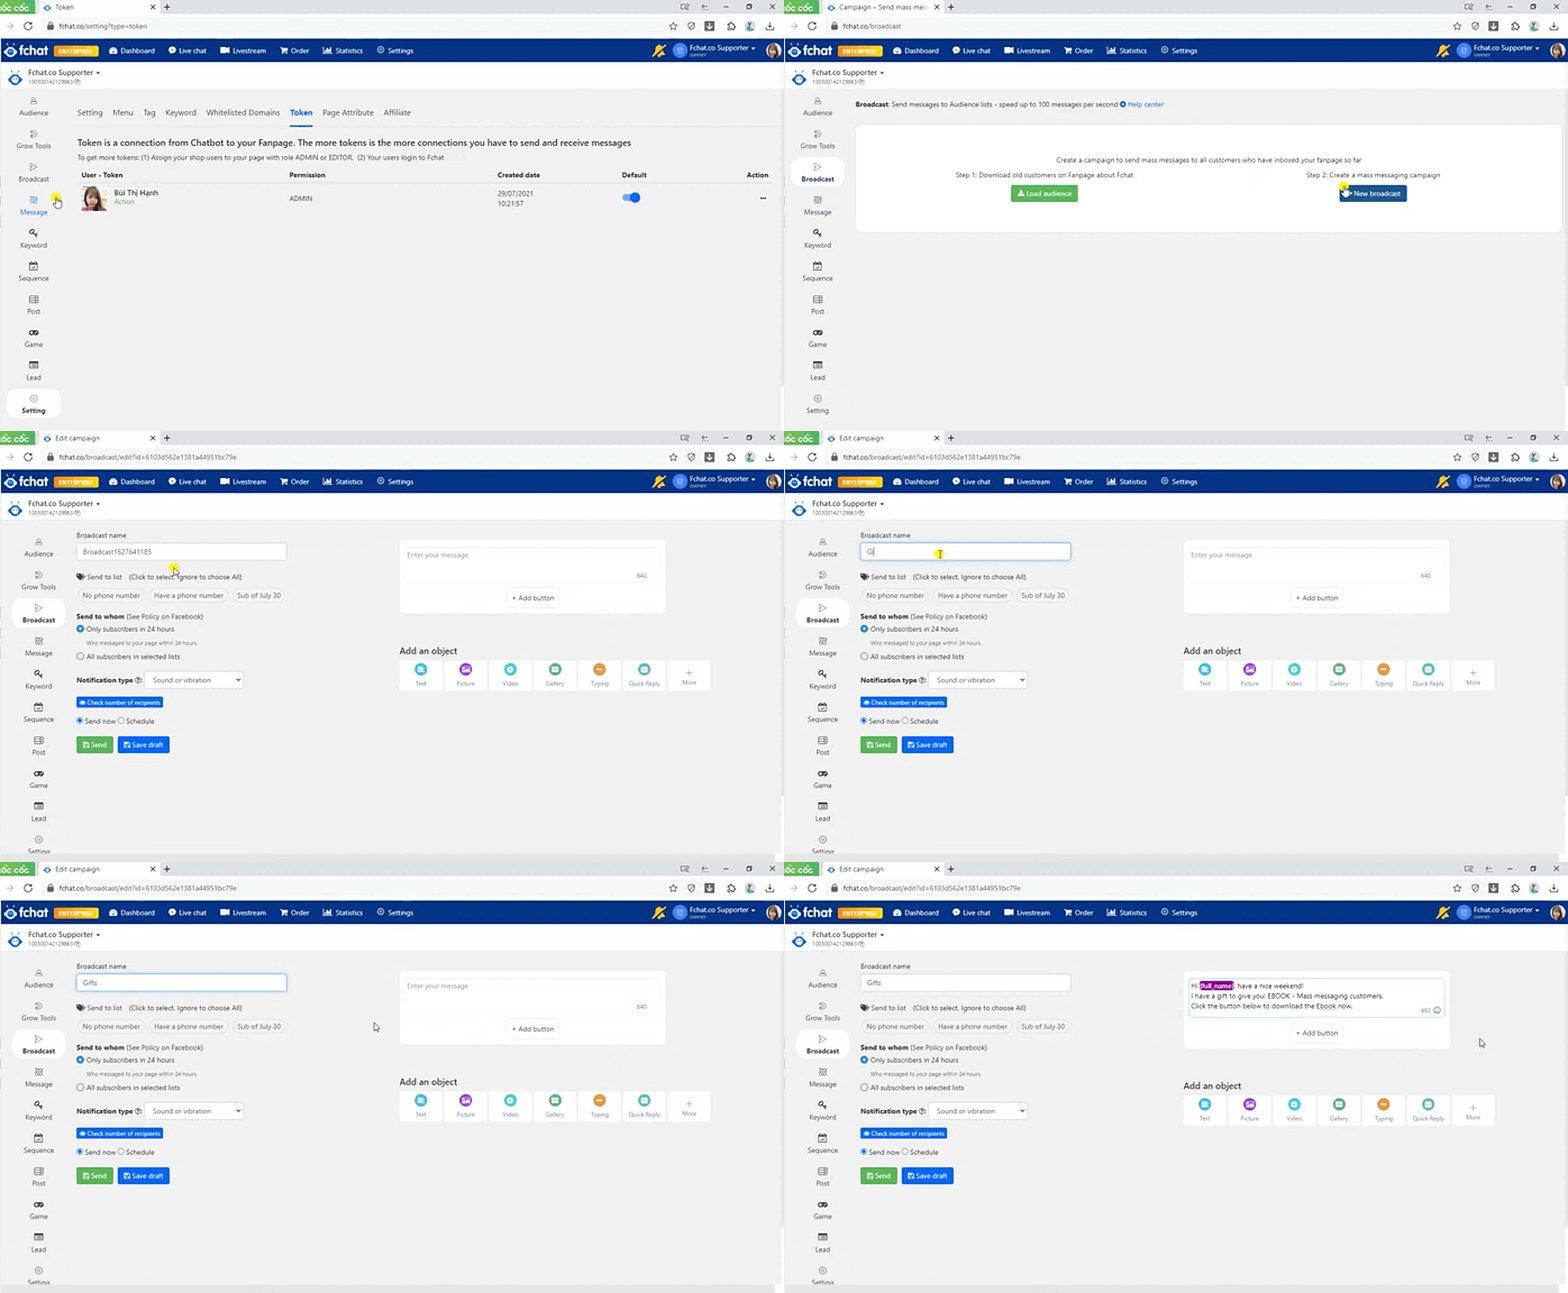
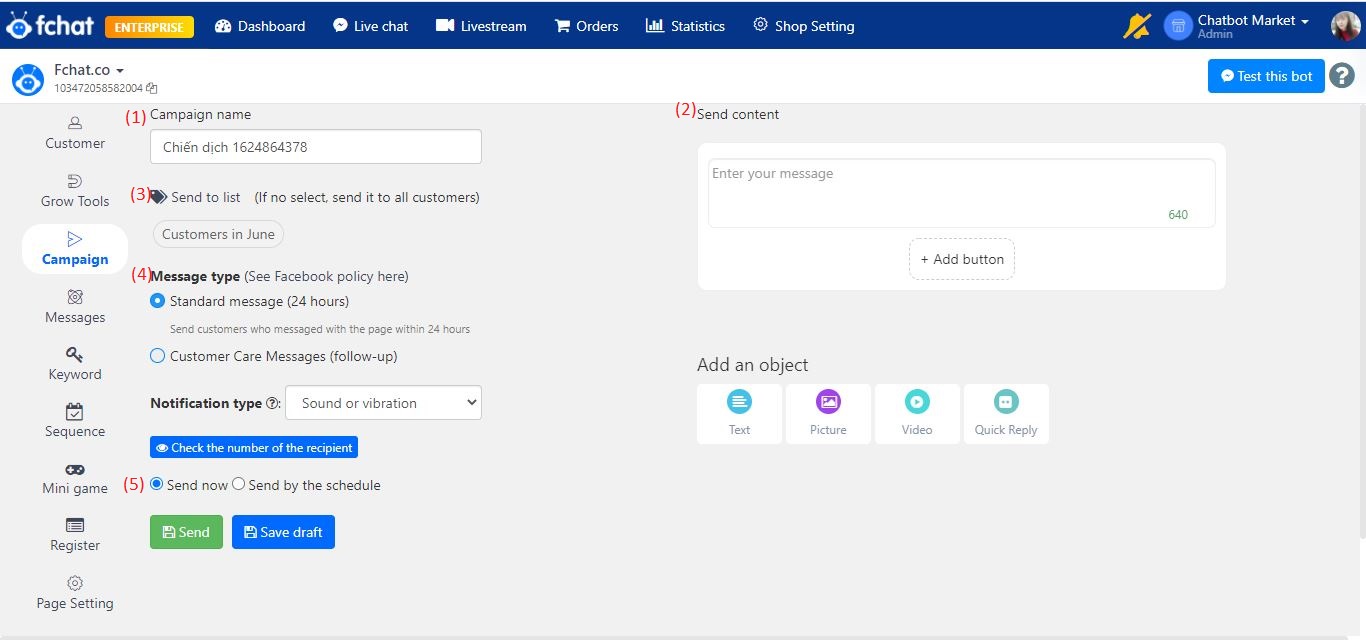
The new campaign update window shows the following:
Here, fill in the following information:
(1) Campaign name: self-manage, customers who receive the campaign will not see the campaign name
(2) Content to send: chose to send to your customers. In the campaign, add objects including Text, Image, Video, Quick Reply. Campaign submissions should be brief. In case sending long content put those content in 1 Block and the campaign has a button pointing to that Block.
(3) Send to list: Here, select the lists suitable for the campaign by clicking on the list name, the selected list will be displayed in blue. If you don't select a list, then send it to everyone in your audience.
(4) Message Type:
- Standard message: send to customers who message the page within 24 hours. With this type of message, content containing advertising is allowed to be sent.
- Customer care messages: send to customers who interact with fanpage exceeding 24 hours. With this type of message, you must not send content containing advertising such as: Promotion, Sale off, Discount, Deal, Coupon, Voucher, sale off, survey,... When sending this type of message you must Select Message Tag (Facebook Tag) that matches the campaign content.
It is recommended to add {gender} and {full_name} variables in the campaign or use SPIN CONTENT to avoid identical content to limit the rate of being marked as spam.
SPIN CONTENT: use words with similar meanings so that the reply content is not identical according to the syntax [A|B|C|D]. In which A, B, C, D are the contents of the same meaning.
Example: Hi {full_name}, you [please|please] [check|check] [inbox|message] to [consultation|directly exchange] !
Note: Campaign content SPIN only works when campaign messages are sent to customers, not when testing this bot campaign script.
In addition, in the campaign, you should include the "Stop receiving messages" button in each message sent, or put it in the Menu of the page to suggest whether the customer wants to receive the campaign message or not before sending the message to the customer.
To send promotional messages to inbox guests after 24 hours, you can create a Sponsored Message on Facebook. You can see details here.
>> How to choose a Facebook Tag when sending a campaign message outside of 24 hours
(5) Choose a delivery schedule - You can send it now or set a delivery schedule for your campaign
Note: Campaigns are not allowed to be sent between 11pm and 6pm
Step 4: Submit the campaign
Click Save to update sending the campaign or Save Draft to save the campaign draft.
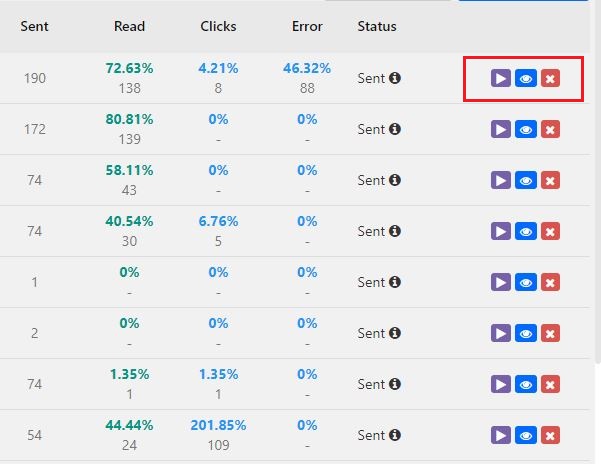
To delete any campaign, return to the screen of the campaign feature, and select the x button in the right corner of the campaign.
If users know how to flexibly apply the campaign sending feature on Fchat, this will be an extremely useful feature in the sales process of the shop as well as in the customer care process later.
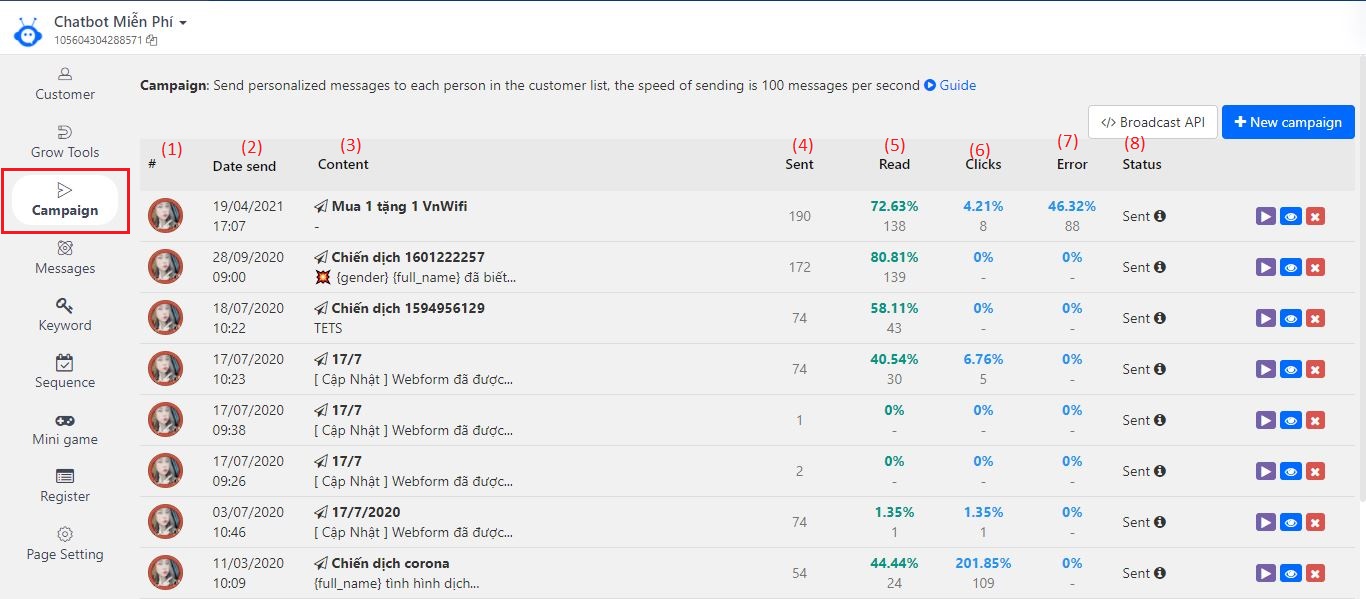
At the campaign screen, the following information are available:
(1) Avatar account creator and send campaign
(2) Specific time to send the campaign
(3) Campaign content
(4) Number of successful senders
(5) Number and percentage of visitors who viewed the message
(6) Number and percentage of visitors who click on messages with buttons
(7) Number and percentage of faulty senders
(8) Campaign status: draft/sent/submitted/paused
So the campaigns sent to your customers are available to track, you can resubmit, review or delete the campaign.
Wishing you success!

